Software Reviews | Popular Photography https://www.popphoto.com/category/software-reviews/ Founded in 1937, Popular Photography is a magazine dedicated to all things photographic. Thu, 31 Aug 2023 19:09:18 +0000 en-US hourly 1 https://wordpress.org/?v=6.2.2 https://www.popphoto.com/uploads/2021/12/15/cropped-POPPHOTOFAVICON.png?auto=webp&width=32&height=32 Software Reviews | Popular Photography https://www.popphoto.com/category/software-reviews/ 32 32 The best photo editing software in 2023 https://www.popphoto.com/story/reviews/best-photo-editing-software/ Wed, 17 Feb 2021 13:06:17 +0000 https://www.popphoto.com/uncategorized/best-photo-editing-software/
A desk with a monitor and laptop setup and Adobe Photoshop on the display.
Abby Ferguson

These editing programs will help you bring your photographic visions to life.

The post The best photo editing software in 2023 appeared first on Popular Photography.

]]>
A desk with a monitor and laptop setup and Adobe Photoshop on the display.
Abby Ferguson

We may earn revenue from the products available on this page and participate in affiliate programs. Learn more ›

Best photo editing software for beginner Luminar AI is the best photo editing software for beginners. Luminar Neo
SEE IT

Software with advanced AI for easy editing.

Best all-in-one Adobe Lightroom Adobe Lightroom
SEE IT

Lightroom can handle almost any type of editing you may need to tackle.

Best for noie reduction DXO PhotoLab 4 DxO PhotoLab 6
SEE IT

DxO helps you get more out of your high ISO photos.

Finding the ideal photo editing software isn’t just about saving the pictures you screwed up. It’s about choosing a program that will drag every last bit of image quality out of your jpegs and raw files. But everyone’s needs are different. Software that’s great for professionals, like Capture One and Adobe Photoshop, might be overkill for more casual users who would be better served with more affordable photo editing software like Affinity Photo. Others may not need a full-fledged desktop app at all and would be just fine using free photo editing software on their smartphones or tablets. No matter what, the best photo editing software will help you get the most out of your photos and even spark new levels of creativity.

The best photo editing software: Reviews & recommendations

Best for beginners: Luminar Neo

Skylum

SEE IT

Key features

  • Price: $99 annually for Explore Plan, $149 for lifetime license
  • Platform(s): Windows, macOS
  • Library management: Yes

Pros

  • Edits are non-destructive
  • Plugins available for other applications
  • Powerful AI editing tools
  • Easy to use

Cons

  • No search bar for tools

Luminar has some of the most advanced AI-driven photo editing features around. The photo editing software automatically suggests different templates you can apply to each image, which optimizes variables like color balance, sharpening, and perspective correction. The software recognizes specific elements in a frame—it can tell a face from a tree—and applies edits to them locally. If you want more control over the process, you can finetune the templates on your own. This approach also helps to add some consistency to your images, which can be challenging for beginners to achieve when they’re just starting out.

Best all-in-one: Adobe Lightroom

Adobe

SEE IT

Key features

  • Price: $9.99/month
  • Platform(s): Windows, macOS, iOS, Android
  • Library management: Yes

Pros

  • Edits are non-destructive
  • Makes batch edits easy for faster editing
  • Built-in camera and lens profiles
  • Mobile app is also excellent

Cons

  • Subscription-based

Unlike Photoshop, Lightroom is built to handle entire photo collections at once. You can import, sort, and edit your files all within the same simple interface. That makes managing large shoots such as weddings much easier and faster. There are two versions: Lightroom CC and Lightroom Classic. The CC version offers a more stripped-down interface that’s simpler to navigate, especially for new users. The Classic version has more legacy options and will satisfy those who want a more old-school experience.

Best with built-in filters: On1 Photo RAW

ON1

SEE IT

Key features

  • Price: $99.99
  • Platform(s): Windows, macOS, iOS, Android
  • Library management: Yes

Pros

  • Attractive built-in filters
  • Helpful library management tools
  • AI-based editing
  • Robust mobile app

Cons

  • Some features are a bit slow

Adding filters to your images can feel like a copout—but pro-grade software like On1′s suite goes way beyond those lazy Instagram looks. On1 offers an array of filters that can make your images look like high-contrast black-and-white or dreamy vintage film. Once you’ve applied the filters, you can tweak the specific variables like highlights and shadows in order to get the aesthetic just how you want it. On1′s suite is also available across a wide range of devices, including computers, tablets, and smartphones, which makes it handy for cross-platform editing.

Best for noise reduction: DxO PhotoLab 6

DXO

SEE IT

Key features

  • Price: $139 for Essentials version, $219 for Elite
  • Platform(s): Windows, macOS, iOS
  • Library management: Yes

Pros

  • Powerful AI tools
  • Useful library management features
  • Superb noise reduction
  • Plenty of editing tools

Cons

  • Elite version is pricey

You might know DXO best for its camera tests, in which it rates the overall image quality offered by various camera sensors. But the company also makes one of the best noise-reduction products around. It can automatically detect what objects in the frame are supposed to be there and which ones aren’t. That makes it excellent for dark shooting situations like astrophotography or photojournalism. It also offers a robust list of library management tools and editing features beyond noise reduction, making it an excellent all-in-one photo editing software as well.

Best for advanced retouching: Adobe Photoshop

Adobe

SEE IT

Key features

  • Price: $20.99/month
  • Platform(s): Windows, macOS
  • Library management: No

Pros

  • Excellent raw file conversion
  • Many different retouching tools
  • AI-based editing tools
  • Supports non-destructive edits

Cons

  • Subscription-based
  • Can be overwhelming to learn

Photoshop is one of the most popular photo editing software options available. That’s largely thanks to its remarkably expansive list of tools and features. If you can imagine something, chances are you can create it in photoshop. Retouchers love all the different tools for cleaning up images, from spot healing brushes to cloning tools. And if you use the beta version, there are advanced AI options for editing items out, expanding your backgrounds, and more. It offers an excellent raw editor with support for every major camera system out there. Plus, your edits can be done based on layers, so you won’t cause any irreversible damage to the original file should you need it.

Best raw photography editor: Capture One Pro

Capture One

SEE IT

Key features

  • Price: $24/month, $179/year, or $299 one-time payment
  • Platform(s): Windows, macOS
  • Library management: Yes

Pros

  • Superb raw file conversion
  • Includes learning tools
  • Attractive built-in presets
  • Makes tethered shooting easy

Cons

  • Pricey

When it comes to overall image quality from raw files, Capture One is the champ. It’s packed with features and allows photographers to make extremely granular adjustments required for high-end work. The panels are laid out clearly, and the tools are effective and easy to use once you get past the initial learning curve. In recent versions, the file management system has also improved greatly. Pros have sworn by this photo editing software for years, and now it has become more accessible for average shooters and enthusiasts.

Best cheap Photoshop alternative: Affinity Photo

Affinity

SEE IT

Key features

  • Price: $69.99
  • Platform(s): Windows, macOS, iPad
  • Library management: No

Pros

  • One-time payment
  • Robust list of editing tools
  • Non-destructive raw editing
  • Fast to load

Cons

  • No library management tools
  • Many features are geared toward designers

For just $70—or cheaper if there’s a sale—Affinity gives users a surprisingly complete set of Photoshop-like features. You can do complex actions like cutting out objects and creating elaborate compositions with your images, in addition to basic photography adjustments like color balance, brightness, and contrast. It has speedy performance, too, which is clutch when you’re working with large photos from high-resolution cameras like the Canon R5. Plus, once you’ve bought it, you own it. There’s no need to pay a monthly subscription fee or worry about finding yourself offline and locked out of your photo editing software because it can’t activate.

What to consider when shopping for the best photo editing software

It’s OK to be selective—the best photo editing software is one that fits you and your needs.

Be realistic about your needs and skill

If you don’t need a ton of features, then they will likely just get in the way and hinder your workflow. You’ll spend time trying to figure out how to find the tools you actually want in a sea of options you don’t need. At the same time, opting for free or cheap photo editing software to save cash may limit your options down the road as your skill—and your style—grows and evolves.

This also relates to the amount of automated help the software offers when it comes to your edits. Professional photographers typically like to micromanage their settings, but it can be helpful as a beginner to get an automated helping hand.

Raw file handling is crucial

Most dedicated cameras and even smartphones offer the ability to capture raw files, which preserve more image data than smaller JPEGS. That extra information provides way more flexibility during the editing process. So, if you blow a shot and underexpose it by three stops, you very well may be able to save it from looking too dark, thanks to the extra bits contained in the raw file. Basic editing software may not support raw files or may have limited support for certain cameras, though. So be sure to verify that the program you are considering supports the files that you need.

Subscription or one-time fee

Photoshop has been the default in-depth photo editor for years. And, if you’re planning to dive deeply into heavy retouching, it’s likely still your best bet. But, with a nearly endless list of features and tools, and the need for a subscription, Photoshop isn’t for everyone. Luckily there are now plenty of photo editing software options that instead offer purchase with a one-time fee instead of a subscription. Some may limit what you have access to or may charge more if you need to update to the latest version, though, so be sure to read the fine print.

Find your filters

Filters are a simple way to up your photography game. Just because you’re using pre-made filters doesn’t mean you can’t have some control over your images. Some photo editing software allows you to apply filters and then tweak them to meet your specific look and save those presets for uniformity.

FAQs

Q: Which photo editing software is best for Mac?

Just about all of the big names, like Capture One and Adobe Photoshop, are available for Mac computers. Some titles, however, may not be updated for the new M1-powered MacBooks. It’s worth checking to see if they have updated yet if you get a new MacBook. Otherwise, all the options should be open to you.

Q: What software do most photographers use?

For in-depth editing on single images, many use Adobe Photoshop or Lightroom. Both programs offer an expansive list of editing tools to meet the needs of just about every photographer. However, Capture One has also grown a significant following because it is also very full-featured and encompasses the entire raw file workflow.

A final word on shopping for the best photo editing software

Even if you have found a photo editing software that you love, it’s worth looking around to see what’s out there every once in a while. If you’re a Lightroom die-hard, new features in Capture One may lure you away. Whatever you pick, make sure you enjoy using it. You’re going to spend a lot of time staring into these interfaces—make it fun.

Why trust us

PopPhoto has a long history of delivering the opinions of some of the sharpest and most prolific camera dorks the world has to offer. Since 1937, we’ve been reviewing cameras, providing wisdom from well-known photographers, and generally just nerding out about all that goes into making great pictures. Our current crop of writers and editors have decades of professional photography and camera writing experience among them. Collectively, we’ve probably shot with just about every camera and lens combo you can imagine—as well as some obscure stuff you may not even know about. Remember the Casio Tryx folding camera? PopPhoto does.

We also get that buying a camera is a big decision, which is why we’re dedicated to helping folks choose the right one (or, in our case “ones”) for their needs. Case in point: Handing over top dollar for an expensive rig may leave you unsatisfied if it doesn’t fit your preferred shooting style. Sure, a $6,000 sports-oriented DSLR can capture landscapes, but do you really need to do it at 30 frames-per-second? No, you don’t.

The post The best photo editing software in 2023 appeared first on Popular Photography.

Articles may contain affiliate links which enable us to share in the revenue of any purchases made.

]]>
Luminar AI review: Algorithms take your photos to weird—and sometimes wonderful—places https://www.popphoto.com/reviews/luminar-ai-review/ Sat, 31 Jul 2021 21:00:00 +0000 https://www.popphoto.com/?p=152113
Luminar AI sample
If you don't go wild with adjustments, it offers solid editing tools that work very quickly. Stan Horaczek

Skylum's Luminar AI uses artificial intelligence to apply automatic adjustments to your photos. They run the gamut from truly impressive to absurd.

The post Luminar AI review: Algorithms take your photos to weird—and sometimes wonderful—places appeared first on Popular Photography.

]]>
Luminar AI sample
If you don't go wild with adjustments, it offers solid editing tools that work very quickly. Stan Horaczek

We may earn revenue from the products available on this page and participate in affiliate programs. Learn more ›

Automatic editing tools have a bad reputation with photography purists. Almost every professional photo editing software offers at least some kind of “automatic” image improvement and they’re often extremely hit-or-or miss. They blindly adjust your image to match curves or levels with no regard for the subject or your creative intent. Luminar AI, however, adds an artificial intelligence aspect (hence the name) to help make automated editing a lot more effective.

What is Luminar AI?

In the land of picture editing software, Luminar AI falls into slightly odd territory. You can import entire folders into your Luminar library, but it’s not made for drastic organization efforts like Adobe Lightroom Classic. With the Luminar AI photo editor, you put the images where you want them, then point the program toward them for editing. 

From there, you can start editing your photos. You have access to a selection of editing tools, but the interface places a strong emphasis on the idea of one-click edits. 

How does Luminar AI work?

Stan Horaczek

SEE IT

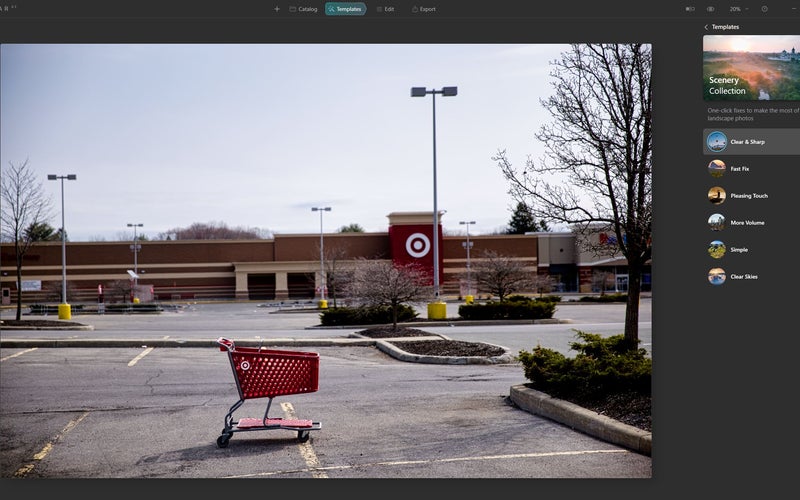
Once you have imported your images, you can start applying adjustments. Luminar AI calls its primary image adjustment method Templates. These are literally one-click adjustments that give your photo a specific look. You won’t find names you’d expect from an Adobe product, though, like “high contrast” or “blue filter.” Instead, Luminar AI takes a more holistic approach and offers templates with names like “Iconic,” which is a high-contrast black-and-white look. You can also apply a template called More Volume which ups the contrast, adjusts the light, and totally replaces an blown out sky with an array of fluffy clouds. 

Luminar AI sky replacement
Luminar AI does a very good job telling where the sky should go. This edit happened with one click. Stan Horaczek

At first, the entire process is jarring. If you’re used to spending copious time fiddling around with sliders and cursor tools, these massive, instant aesthetic shifts can be hard to accept. Once you get over that hump, though, it becomes clear just how powerful this bit of software really is. 

Building your catalog

Before we get too deep into the editing process, we have to pull our photos into the program itself. Luminar AI uses a catalog system that presents added photos as a simple grid that you can scroll through. I imported a few hundred raw files from my Canon R5, which felt like a mistake. Even on my Ryzen 9 machine with 64 GB RAM, I managed to crash the program while scrolling gingerly through the catalog. So, even though you can import all your images fairly simply, I can’t recommend it. 

Starting an edit with Luminar AI

Once you find an image you want to adjust, there are two modes on top of the UI to choose from Templates contains those one-click AI adjustments I mentioned before. The Edit tab contains more familiar adjustments. 

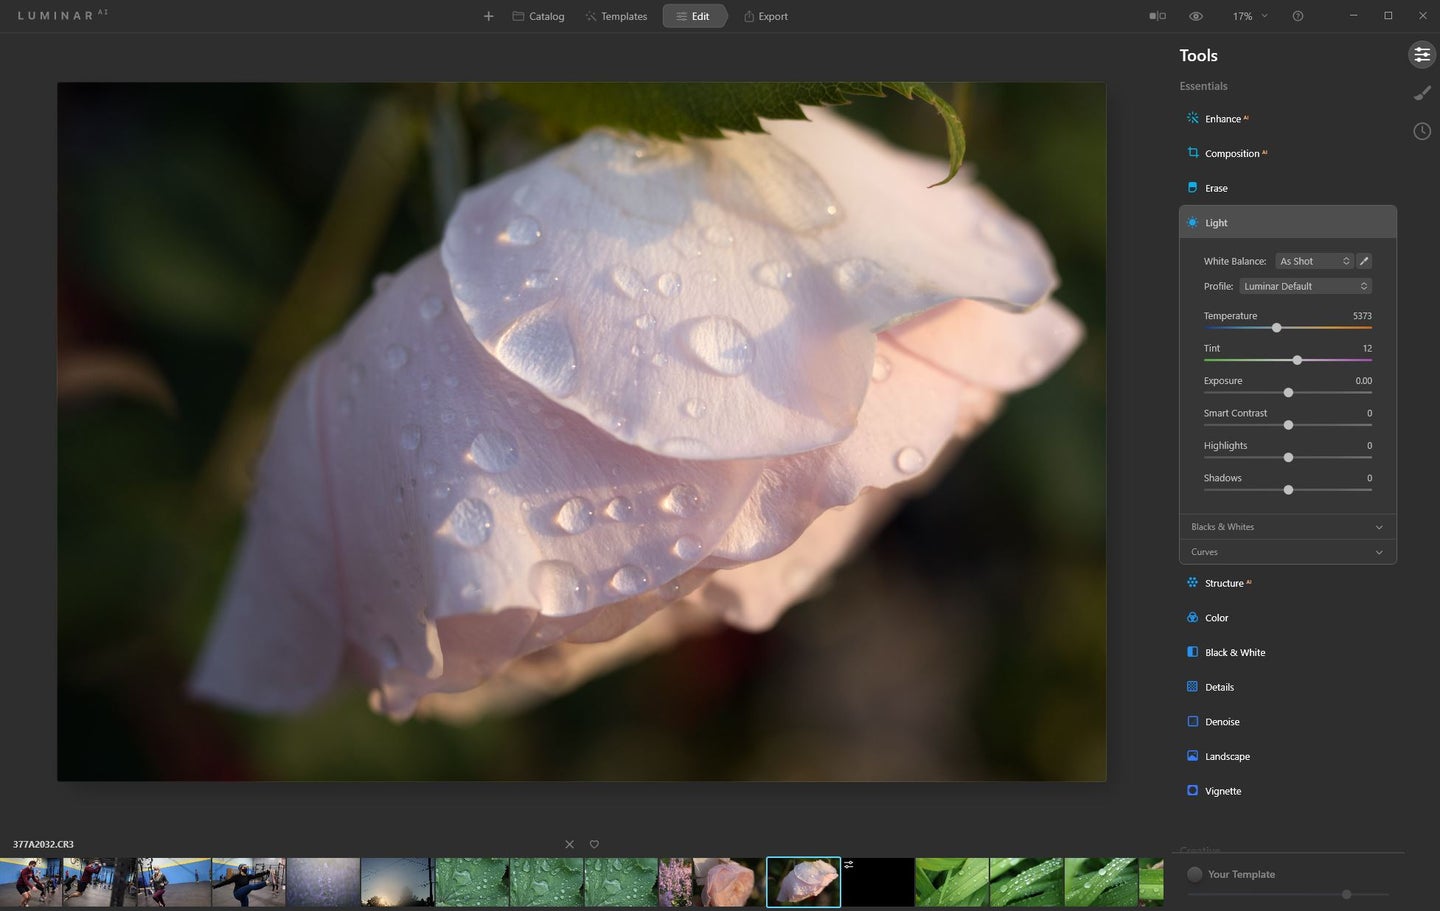
Click into the “light” dialog box and you’ll get familiar sliders like temperature, tint, exposure, highlights, and shadows. Many of the other options, however, read slightly different than you might be used to. 

Each set of tools that employs AI technology has a little yellow AI next to it in the menu. The “enhance” menu, for instance, contains a slider called “accent,” which appears to increase vibrance and micro contrast in high-frequency details. It also contains another slider called Sky Enhancer, which tries to prevent boring skies in your images. 

Scroll down and things get even more interesting. The Creative tab contains several entire menus specifically designed to replace skies in your images. A drop-down menu gives you a whole selection of different skies with various levels and types of clouds. Once you select one, you can change its position, switch it around, and even move some sliders to try and adjust the lighting in the image to match what would be coming from the new sky. 

If you’re a photography purist, you’re going to hate all of this. If you’re a curious person, or you just really hate blow skies, then it’s certainly intriguing. 

What about portraits?

Luminar AI
The new Portrait Bokeh mode feature relies on Luminar’s selection tech, which is impressive. Stan Horaczek

The latest Luminar AI update introduced a new feature called Portrait Bokeh, which adds Portrait Mode-style blur to everything except the person in a portrait photo. This, of course, draws on AI algorithms to recognize the subject and add the blur. You can adjust the amount of blur it ads and even refine the look of the bokeh. 

Again, this works fairly well most of the time. It even managed to mostly navigate my treacherously bearded face. I appreciate the ability to adjust the quality and amount of blur. Overall, the effect looks OK, but it’s not enough to have photographers swearing off big, heavy, f/1.4 lenses forever. But, this is a $99 piece of software and that’s not the point. 

Luminar AI also offers AI-powered retouching features, which I don’t love. You can use one slider to skinny up your face and another to do the same with your body. The AI-powered skin slider allows you to add a smoothing effect to your epidermis, which can quickly go from flattering to creepy West World vibes with the slightest adjustment. 

Luminar AI
When you start pushing the adjustment sliders too far, you can create some truly awful things. I wish I could unsee this, but now you have also seen it. Stan Horaczek

I took a simple selfie to test out the new Portrait Bokeh feature and fell down a rabbit hole of AI-powered sliders that left me looking like a puppy dog that belongs on the cover of a Lisa Frank Trapper Keeper. 

That may sound like a wholesale knock on Luminar AI, but it really isn’t. In truth, I could achieve the same look with Photoshop. It just would have taken a lot more time and effort. 

The overall editing process

Once I closed my absurdly edited portrait, I started over again fresh. Once you get the over-the-top stuff out of your system, you can start digging into the real practical features that Luminar AI offers. 

At least for me, the process of dialing in my edits took a ton of trial and error. I opened a few images and applied some adjustments just to see what the Mystical slider does. How would the Cyberpunk template look on my face? It’s compelling, and sometimes a little confusing. 

Like other photo editing programs, Luminar AI allows for individuals and companies to create their own looks and then sell them to users who can import them into the program. In fact, Luminar has a whole marketplace where its users can buy custom-made templates. 

It really seems like the secret to nailing your edits with Luminar involves finding the right Templates that fit your shooting style and sticking with them. Once you’ve applied a template, you can make individual adjustments or even tone down the filters’ overall effect. But, I truly think it works better if you just lean into it. 

So, is Luminar AI a good photo editor?

While I enjoy using Luminar AI, this photo editor fills a somewhat curious segment of the image editing software market. It has a very mobile app feel about it and the editing techniques you learn through this program won’t necessarily translate into other platforms. If you go looking for the Mystical slider in Capture One Pro, you’re going to find yourself disappointed. 

While purists may scoff or snicker at the idea of one-click lens flare or sky replacement, there’s a whole contingent of people to whom that sounds great. Every time you take a picture with your phone, you’re using computational photography, which means AI is helping you out with your image. This feels like a natural and very advanced extension of that. 

Who should buy Luminar AI?

If you’re willing to put in some work upfront, you could certainly create an entire photography workflow that centers around Luminar AI and its templated looks. Even if you’re not using it all the time, you may find a few templates that come in handy from time to time. The Film Noir template in the Blockbuster collection actually provides a fairly solid baseline black-and-white conversion. 

So, while I think you should think long and hard before you go replacing skies in your photos or making yourself skinnier with the “torso” slider, you can do whatever you want. The site will give you a free Luminar AI trial during which you can download and apply the templates to see how they fit your work. You may just find that it’s the best photo editing software for you.

The post Luminar AI review: Algorithms take your photos to weird—and sometimes wonderful—places appeared first on Popular Photography.

Articles may contain affiliate links which enable us to share in the revenue of any purchases made.

]]>
Best video editing software for Macs in 2023 https://www.popphoto.com/gear-reviews/best-video-editing-software-for-macs/ Tue, 03 May 2022 18:00:00 +0000 https://www.popphoto.com/?p=170312
Adobe Premiere
Adobe

Create awesome videos with these editing programs.

The post Best video editing software for Macs in 2023 appeared first on Popular Photography.

]]>
Adobe Premiere
Adobe

We may earn revenue from the products available on this page and participate in affiliate programs. Learn more ›

Best Overall Adobe Premiere Adobe Premiere
SEE IT

This powerful program ties neatly into the Adobe infrastructure

Most User-Friendly Final Cut Pro Final Cut Pro
SEE IT

Apple’s own pro video editing software offers powerful features with a streamlined interface.

Best Free iMovie screenshot iMovie
SEE IT

This free software has surprisingly powerful features.

Whether you are a seasoned video editor or an enthusiastic amateur, if you are looking to edit video footage you are likely working on a Mac. There are a ton of powerful programs currently on the market that allow you to turn that awesome footage into a video. The best editing software for Macs offers the features you need without a ton of bloat and complicated interfaces.

How we picked the best video editing software for Macs

The video editing software that is featured in this buying guide are all products that we have used to edit personal projects or covered for an editorial review. When selecting the products for this guide it was important to include editing software that would fit all three types of video editors: beginners, amateurs and professionals. As the price of these products is often related to the kind of user that it is geared to we naturally considered that as well. Ultimately we wanted to represent a variety of choices that are good for a variety of editing levels and styles.

Best video editing software for Macs: Reviews & recommendations

Best overall: Adobe Premiere Pro

Adobe

SEE IT

Key features 

  • Industry-standard program 
  • Non-Linear editing program
  • Works seamlessly with other Adobe products 

Pros

  • Intuitive timeline editing 
  • Supports footage up to 8K
  • Features are regularly updated 
  • Automatically reframe videos for sharing on different platforms

Cons 

  • Requires a paid subscription
  • Prone to crashing if you are editing massive projects (always be saving!)  

Simply put, Adobe Premiere Pro is the video editing software that is most widely used by all types of video editors. It’s the go-to program of most news organizations, indie filmmakers, documentary shooters, music video editors, YouTubers and more. It has intuitive timeline editing, includes all kinds of customizable presets, built-in effects and color adjustments that simplify the editing process so you can focus on bringing your vision to life. And because it’s used by so many video editors it makes it easy to do collaborative edits by sharing timelines back and forth. The UI can be a little overwhelming if you are new to Adobe products, but with a little bit of time you can customize your workspace to fit your needs. If you are looking to take your video editing to the next level or trying to break into editing as a career, Premiere Pro is a program that you need to know. Although it is a subscription-based pricing model, you can select a monthly plan and only pay for it as you need it—although paying for a year’s worth upfront will save you some bucks in the long run.

Most user-friendly: Final Cut Pro

Apple

SEE IT

Key features 

  • Approachable UI 
  • Linear editing 
  • Optimized for MacOS systems 

Pros 

  • Easy to use 
  • Very fast with Mac 
  • Supports 360 footage 
  • Magnetic timeline

Cons 

  • Linear editing can be irritating for long-time editors
  • No search function for imports 

Apple’s prosumer-level video editing software offers professional-level editing tools packaged inside an extremely user-friendly interface. While this is great for someone who is just starting out or making the jump from a free program like iMovie, the magnetic timeline editing and hidden professional functions can be a little frustrating for anyone who has used Premiere or earlier versions of Final Cut. Although it’s just as capable as Premiere in terms of function, it isn’t quite as widely used by professional organizations and it can be difficult to use for collaborative back-and-forth editing jobs. That being said, it does tend to be a more nimble program than Adobe Premiere because it was designed directly by Apple—meaning it’s faster and less prone to crashing than some competitor software. 

Best for all-in-one production: DaVinci Resolve

Blackmagic

SEE IT

Key features

  • All-in-one tool for editing, color, VFX, motion graphics and audio
  • Well-designed interface
  • Cloud-based workflows

Pros

  • Available as free and paid versions
  • User-friendly interface
  • More control over color corrections

Cons

  • Requires a computer with lots of system resources and space
  • Steep learning curve for advanced functions

DaVinci Resolve is the only editing software that offers an all-in-one package, making it easy to cut, color correct, edit sound, and add motion graphics without ever having to leave the program. However, these are all specialized skill sets, and although the program has a very user-friendly interface, the learning curve on mastering the capabilities of the powerful program can take a while to achieve. It’s available as a free version or the paid DaVinci Resolve Studio version for a one-time fee of $295—making it a comparable price to its competitors. Realistically though, if you have a powerful computer the free version should serve you well in most situations. DaVinci Resolve also happens to be one of the best programs out there for color correcting, but you will need to upgrade to the studio version to access tools like HDR grading and HDR scopes.

Best budget editing software: Cyberlink PowerDirector

CyberLink

SEE IT

Key features

  • 4K video support 
  • Supports 360 VR 
  • Tons of stock content from Getty Images and Shutterstock

Pros

  • Fast rendering
  • Tons of effects and presets
  • Supports 360 VR

Cons

  • Somewhat overwhelming UI  
  • No Keyword tagging

PowerDirector 360 has been a long-time favorite of Windows users looking to edit video, and in 2020 CyberLink finally released a version for Mac users. It offers more flexibility and precise editing tools than a program like iMovie, but isn’t quite as advanced as programs like Final Cut Pro or Adobe Premiere—making it a great stepping stone for someone looking to upgrade from iMovie, who isn’t quite ready to invest in a more expensive piece of editing software. The program is regularly updated and includes fast rendering speed and tons of effects and presets that make it easy to put something together without much editing experience. Multicam editing tools lets users include 2-7 different perspectives and it comes with a large library of royalty-free music that can be used in the background of your videos. If you’ve primarily been a Windows user the learning curve with this piece of editing software will be much less steep.

Best free video editing software: iMovie

Stan Horaczek

SEE IT

Key features

  • Built-in templates 
  • Customizable motion graphics 
  • Supports 4K video

Pros

  • Extremely simple interface
  • Lots of built-in templates
  • Free
  • Good for very simple edits

Cons

  • No tagging support
  • Limits users to two video tracks
  • No multicam editing functionality

If it’s simplicity that you crave in your video edits, you certainly can’t beat the price of iMovie. The app is free for all Mac users and has an extremely simple interface and tons of built-in templates and effects that are good for making simple, short videos that still look good. While it lacks some of the professional-level tools that the other video editing software featured in this guide have, if your project doesn’t call for that level of precision, this is a worthwhile program. While we wouldn’t recommend it for cutting together a feature-length film or a professional-level project, it’s a fast and free tool for editing a few clips together for personal use or for social sharing.

Things to consider when shopping for the best video editing software for Macs

Video editing software is broken down into three different categories: entry-level, enthusiast or consumer, and professional. When selecting the video editing program that might be right for you consider where you fall currently and where you aspire to end up. 

Entry-level programs are often free to use, but offer limitations when it comes to making precision edits. Apple’s iMovie is one of the most well-known entry-level programs. An enthusiast or consumer program will give you a bit more control, have a user-friendly interface and typically still offer a number of templates and built-in effects to make editing a painless process. Programs like Premiere Elements and Cyberlink PowerDirector are well-known programs for enthusiast-level editors. 

RELATED: The best laptops in 2023

At the professional level, you will find programs like Adobe Premiere and DaVinci Resolve—these programs are what’s known as “industry standard” programs and if you want to get paid to edit videos having a knowledge of how to use these programs is a must. They also tend to be the most expensive, but if video editing is a long-term goal for you, it’s well worth the investment. 

FAQs

Q: Is Final Cut Pro only for Mac?

Yes, Final Cut Pro is only available for Mac users. No Windows version of Final Cut Pro exists.

Q: What do YouTubers use to edit videos?

The majority of camera or technology YouTubers are typically using Adobe Premiere to edit their videos or Final Cut Pro—and it’s a subject that many of them will tag in their videos, or dedicate entire episodes to. Other types of YouTubers may be using less expensive software to cut together their videos. Programs like Premiere and Final Cut Pro give editors the most flexibility and because they are so commonly used by other creatives it’s easy to share projects back and forth for collaborative editing.

Q: What video editing software should I use?

Choosing video editing software has a lot to do with taking a look at your needs and your budget. If you are trying to video edit as a full-time career or a side gig investing in a subscription to Adobe Premiere is probably a good choice. It’s also one of the easier programs to do collaborative editing jobs on. Final Cut Pro is sometimes used by professional organizations, as an alternative and somewhat more beginner-friendly program compared to Premiere. However, both of these programs you will need to purchase in order to use. If you are looking for something free for a one-off video project check out DaVinci Resolve (if you end up loving it you can always upgrade to a paid version). For an extremely beginner-friendly and budget friendly option consider iMovie. It won’t give you the kind of precision editing of these other programs, but if you are a Mac user it is a free download in the Mac store.

Q: How much does video editing software cost?

Video software is typically sold as a subscription-based model or a program that you purchase one time. Adobe Premiere subscriptions will cost you either $20.99 per month or if you pay up front $239.88 per year. Final Cut Pro is sold as an app for a one time fee of $299.99. Power Director costs approximately $5 per year or can be purchased for 48.99 for an entire year. A program live DaVinci Resolve can be downloaded for free, but if you want access to more controls like HDR scopes and HDR grading you will need to download DaVinci Resolve Studio, which costs a one time fee of $295. iMovie is free if you are a Mac user. 

Q: Where to buy video editing software?

Video editing software is usually purchased as an app through the app store or directly from the websites of the company that makes it.

Q: Who makes the best video editing software?

The best depends a lot on what you plan to use the editing software for and what your long term goals are. If you are putting together a cute video of your vacation clips using something simple like iMovie will probably be just fine. If you are looking to make money for editing videos or diving into projects that will require more finesse a program like Power Director, Final Cut Pro Adobe Premiere or DaVinci Resolve will probably be better suited to your needs.

Q: Why buy video editing software?

Purchasing video editing software rather than relying on a free program will give you more control over the edit, allowing for smoother transitions, audio editing, custom title cards and color adjustments. Simply put, purchasing a piece of video editing software means that you will be able to produce a more polished and professional looking final project.

Final thoughts on the best video editing software for Macs

Ultimately choosing the right video editing program for you depends a lot on what you are shooting, how you are editing your footage and what your long-term goals might be. If you aspire to professional-level editing work, investing and learning technology like Adobe Premiere or DaVinci Resolve is a good first step to getting there. If you are looking to work alone and do more personal projects a program like Final Cut Pro might be a better fit. If you are looking for something that lets you make quick and easy edits for personal use an entry-level or enthusiast-level editing system might be more your speed.

The post Best video editing software for Macs in 2023 appeared first on Popular Photography.

Articles may contain affiliate links which enable us to share in the revenue of any purchases made.

]]>
The best photo restoration software in 2023 https://www.popphoto.com/gear-reviews/best-photo-restoration-software/ Tue, 16 Aug 2022 16:00:00 +0000 https://www.popphoto.com/?p=182289
These are the best photo restoration software options.
Abby Ferguson

These photo restoration software options will help you save old photos.

The post The best photo restoration software in 2023 appeared first on Popular Photography.

]]>
These are the best photo restoration software options.
Abby Ferguson

We may earn revenue from the products available on this page and participate in affiliate programs. Learn more ›

Best overall PhotoGlory PRO is the best overall photo restoration software. PhotoGlory PRO
SEE IT

It offers lots of automatic adjustments.

Best professional Photoshop is the best professional photo restoration software. Photoshop
SEE IT

This is the best for professional-level edits.

Best powerful Luminar Neo is the best powerful photo restoration software. Luminar Neo
SEE IT

A powerful but simple to use program.

Photo restoration software can make your old family photos look like you just picked them up from the corner photo processing shop (yes, those were once a thing). Fixing those crimped corners, tears, water stains, and faded colors that are inevitable symptoms of the passage of time is no longer the exclusive domain of skilled artists. Today it can be done at home in a fraction of the time and at minimal expense.

If you’ve been wondering what to do with that shoebox full of grandma’s faded old photos, it’s time to dig them out and show them some love. Here are some of the best photo restoration software you can buy and what you need to know to pick the one that’s right for you.

Methodology: How we picked the best photo restoration software

Software users run the gamut from raw beginners to super-users. So picking from the many excellent photo editing options available today meant looking at things like AI, manual editing tools, and ease of use. We considered more than a dozen different options, from basic online tools to highly advanced, comprehensive editors, and chose the ones that benefited the most users.

At a bare minimum, our picks had to have easy-to-use basic tools for correcting common defects like scratches, stains, and tears. Or it needed AI features that were smart enough to make these kinds of corrections satisfactorily. We also looked for software that offered nice-to-have features like colorization, which can be challenging to do manually, especially for beginning users. We favored software with a one-time licensing fee versus a potentially expensive ongoing subscription. And since the learning curve can be steep for people unfamiliar with image editors, we gave bonus points to software with good tutorials. 

The best photo restoration software: Reviews & recommendations

Best overall: PhotoGlory PRO

PhotoGlory

SEE IT

Why it made the cut: PhotoGlory PRO gives you control over your work without the learning curve. It has a colorizing feature, too, which is often missing from similar programs.

Specs

  • Pay structure: One-time payment
  • Compatible operating systems: Windows
  • AI-based editing: Yes

Pros

  • Easy-to-use tools work automatically and give you manual control when needed
  • Photo effects feature lets you add back a vintage look
  • No color-correction guesswork: AI corrects colors automatically
  • One-time payment gets you a lifetime license

Cons

  • Not available for MacOS

Whether you’re a beginner or an image editing pro, PhotoGlory PRO is a great choice. It boasts a fully-automatic photo restoration feature, which removes tears, scuffs, dust, and other defects without any user input. If the results aren’t quite perfect, you can use manual tools like a cloning tool and a healing brush to fix any details you aren’t happy with. This combination of AI photo correction and manual tools makes PhotoGlory PRO the best of both worlds. It doesn’t matter if you have a large batch of photos that need repair or just a handful. 

There are three versions of PhotoGlory: Standard, Deluxe, and Pro. All versions offer colorizing and basic repair of tears, scratches, and faded colors. For a small extra cost, the Deluxe and Pro versions also offer manual coloring and the ability to recreate missing parts of an image. That can be useful if you have photos with substantial defects. The only extra feature the Pro version has is 100+ filter effects. So, if that’s not something you think you’ll play with much, PhotoGlory Deluxe should be adequate.

Best professional: Photoshop

Adobe

SEE IT

Why it made the cut: Photoshop is the undisputed pioneer and leader in professional photo editing. It has more features than any other photo editor, giving you almost unlimited creative control over your images.

Specs

  • Pay structure: Monthly or annual subscription
  • Compatible operating systems: Windows or macOS
  • AI-based editing: Yes

Pros

  • More features and adjustment possibilities than any other photo editing software package
  • Many tools work manually or automatically and can be fine-tuned
  • AI-powered downloadable Photo Restoration Neural Filter (currently in Beta)
  • Layers and smart objects let you make infinite non-destructive adjustments

Cons

  • Expensive subscription-based payment model
  • Can be overwhelming to learn

Photoshop does just about everything, from removing scratches, scuffs, and stains to improving your subjects’ complexion, straightening hair, and whitening teeth. It has a range of color correction tools and lets you work in layers. Layers allow you to keep track of your adjustments and undo anything that isn’t working for you. Photoshop is widely used, so it’s easy to find tutorials online, including directly from Adobe. But because they come from a variety of Photoshop users, some are much easier to follow than others. 

Photoshop’s major drawback is that it’s not a great tool for beginners. If you’ve only used basic photo editing tools, it’s easy to get overwhelmed by all the features and customizations when using this software. If you’re a raw beginner and set on learning Photoshop, it’s a good idea to take a class before committing to it.  

In June of 2023, Photoshop announced its Photo Restoration Neural Filter, a downloadable add-on that restores old photos automatically. This feature ups its game for people who want a quick and easy way to repair old photographs. But if that’s all you need, it’s probably overkill to buy an expensive and complicated software package just for the photo restoration add-on. 

Best free: GIMP

Abby Ferguson

SEE IT

Why it made the cut: GIMP is an open-source software that has been around for some time now. It’s totally free and offers plenty of tools for restoring your photos.

Specs

  • Pay structure: Free
  • Compatible operating systems: Windows, macOS, Linux/GNU
  • AI-based editing: No

Pros

  • Totally free to use
  • Robust set of tools
  • Supports a variety of plug-ins
  • Highly customizable

Cons

  • No AI features
  • Isn’t extremely intuitive

GIMP 1.0 was released back in 1998, and it has been one of the staples of free editing software since. The program is free and easy to access, with no need to even enter an email address or contact information. It’s an open-source platform, meaning anyone can see and modify the source code. As a result, it is a highly customizable software with a significant number of scripts and plug-ins created by the GIMP community. And this editing software is available for Windows, Mac, or Linux. 

Though GIMP doesn’t offer advanced features such as AI-based editing, it still has plenty of tools for basic photo restoration. For example, there is a clone stamp and healing brush for fixing scratches, tears, or bends in scanned images. And there are plenty of tools for color correction and contrast adjustment. 

Another plus with GIMP is that you can work in layers, like Photoshop, so that you are making non-destructive edits. That’s ideal in case you make a change you don’t like or adjust the colors just a bit too far. The software does take some getting used to, but there are plenty of tutorials available, as well as some help text in the program itself. 

Best powerful: Luminar Neo

Skylum

SEE IT

Why it made the cut: Luminar Neo is a comprehensive photo editor with smart, easy-to-use tools for simple restoration. It also has a range of advanced tools for more complicated work.

Specs

  • Pay structure: Monthly or annual subscription (two tiers), or lifetime license
  • Compatible operating systems: Windows or macOS
  • AI-based editing: Yes

Pros

  • Does more than just restore old photos
  • Simple, easy-to-understand user interface 
  • Much more budget-friendly than professional software like Photoshop
  • One-time payment gets you a lifetime license

Cons

  • Uses a lot of RAM

Luminar Neo is not quite as beginner-friendly as many dedicated photo restoration software options. Instead, it’s a good choice for advanced beginners to intermediate users who want a lot of control over their results and the flexibility to make other edits to their modern digital photos. 

Luminar’s photo restoration tools will be familiar to anyone who has used Photoshop. There’s an adjustable clone and stamp tool for removing tears, scuffs, and stains. And there is a range of color and tone tools to help you enhance detail, correct uneven color, adjust color temperature, and remove excess grain. If you’d prefer not to make manual adjustments, Luminar also has AI features that automatically correct exposure, color, and details. 

This software is available for both Windows and Mac. Though it’s more expensive than a typical dedicated photo restoration package, it’s available for a one-time purchase that gets you a lifetime license.

Best easy-to-use: Retouch Pilot

Retouch Pilot

SEE IT

Why it made the cut: Retouch Pilot is bare bones but does the job. And with its large library of tutorials, it’s easy for even a beginner to learn and use.

Specs

  • Pay structure: One-time fee
  • Compatible operating systems: Windows
  • AI-based editing: No

Pros

  • Makes small repairs quickly and easily
  • Tutorials walk you through each tool step-by-step 
  • Inexpensive compared to other dedicated photo restoration programs
  • One-time payment gets you a lifetime license

Cons

  • Concealer tool doesn’t have a color sampler, which makes it hard to match colors 
  • No colorization feature

Retouch Pilot is a great choice for a raw beginner. It’s also ideal for someone who doesn’t want to install a big, memory-hungry software package with many advanced features that will probably never get used. The tools are easy to use, but the most beginner-friendly thing about Retouch Pilot is its library of video tutorials. If you can’t figure out how to use a tool or feature, there’s almost certainly a video that can answer your questions.

Retouch Pilot does everything you would expect from a good photo restoration tool. Its easy-to-use, built-in tools let you correct scratches, scuffs, and stains. The Smart Patch tool is especially useful if you have photos with large defects, such as missing corners or significant water stains. Retouch Pilot can also do something other dedicated restoration programs can’t–you can use the Elastic tool to change your subject’s proportions and form (think of it as a digital tummy-tuck). 

Retouch Pilot is one of the least expensive options on this list, and you don’t need to purchase a subscription to use it. Pay once, and you get a lifetime license.

Best online: VanceAI Photo Restorer

VanceAI

SEE IT

Why it made the cut: VanceAI Photo Restorer is super easy to use and doesn’t require a download, so it’s ideal if you only need to edit a few photos. 

Specs

  • Pay structure: Pay per photo or subscription-based
  • Compatible operating systems: N/A
  • AI-based editing: Yes

Pros

  • No download required
  • Pay-as-you go option is great if you don’t have an ongoing need to restore photos
  • All-automatic photo repair is good for beginners
  • Colorizes black and white photos

Cons

  • No user control over edits, and results can be imperfect
  • Subscription-based model could get expensive over time

VanceAI Photo Restorer is all online. As a result, it’s a good choice if you only have a few photos to fix and don’t want to download a bulky software package. The software gives you the first couple of images for free (with a watermark), so you can see the results before you commit. After that, you can sign up for a subscription, which gives you a limited number of images per month. Or you can forego the subscription and buy as many credits as you need upfront. 

One drawback to VanceAI’s payment model is that you can’t buy less than 200 credits (for repairing 200 photos). So if you have only a handful of photos to fix, you might be better off signing up for a one-month subscription and canceling it as soon as you’ve fixed all your photos. On the flip side, your subscription or credits also give you access to VanceAI’s other photo editing tools. These include sharpening, enlarging, and retouching, so it’s also useful for editing your modern photos.

VanceAI Photo Restorer does good work on faces, and the colorization feature is nice to have. But, unfortunately, it misses things like dust and does an imperfect job of fixing creases and other large defects. On the other hand, not everyone wants to take the time to hand-correct every photo, so those automatic features are great if you want to improve a lot of photos and aren’t expecting perfection.

Things to consider before buying the best photo restoration software

Software that’s capable of fixing your old photos can be highly specialized, or it can be a smaller part of a complete image editing software package. Which option you choose depends a lot on your budget, how much experience you have at photo editing, and how badly damaged your photos are. 

Scratch, tear, and stain removal

Photo restoration software needs to do a few basic things, but most of all, it should be capable of quickly and easily correcting flaws like tears, scuffs, and stains. Some of the most user-friendly versions can do this automatically, while more advanced versions may require a little more hands-on work. That’s both good and bad. Automatic corrections make things easy, but sometimes it doesn’t quite do the job, and it’s good to have the option to make manual changes.  

Ease of use

Photo editing software can be famously complicated. Some of the more comprehensive options have a steep learning curve. So if you don’t already have some experience editing your photos for things like brightness and contrast, dust removal, and crooked horizons, you may want to opt for software that’s smart enough to make automatic corrections.

Colorization

Not all restoration software offers colorizing as a feature. That’s okay if you prefer to keep your restored photographs true to the originals. However, if you want to add some color to your black-and-white or sepia-toned images, look for software that can do this automatically. Hand coloring can be tedious and doesn’t always produce the desired effect.

FAQs

Q: What is the best way to restore old photos?

The best way to restore old photos is with photo editing software. Most photo editors have clone and stamp tools, color adjustment features, and other tools that will do a good job fixing minor defects. If you’re not confident in your ability to use a more comprehensive tool, an AI-based, dedicated photo restoration tool is a good choice.

Q: How can I digitally enhance old photos?

Most photo restoration programs can correct simple defects, but you may also want to digitally enhance your old photographs with tools that sharpen and remove grain. Some of these features are available in dedicated photo restoration programs. Still, if you want more advanced editing functions, shopping for a more comprehensive photo editing package is a good idea.

Q: How do you remove dirt from old photos?

You can remove dirt from old photos with a spot-healing tool or clone stamp. These tools are built into most photo restoration packages and more comprehensive options like Luminar and Photoshop. They work by taking a sample of an unblemished part of the image and pasting those pixels over the dust or other defect.

Q: Is it better to scan or photograph old photos?

Generally speaking, it’s much better to scan an old photo than photograph it. Scanners block ambient light and shadows that might create glare or dark patches on your pictures. A scanner will also flatten old photos that are bent or have curled corners, which will keep them from looking distorted. 

Final thoughts on the best photo restoration software

It was important for our best pick to be useful for both beginners and advanced users. This is why our best overall choice was a dedicated photo restoration program rather than a more feature-rich, comprehensive package like Photoshop. We liked PhotoGlory’s intuitive interface and AI features, but we also enjoyed having the flexibility to make manual corrections if the automatic ones fell short. 

The post The best photo restoration software in 2023 appeared first on Popular Photography.

Articles may contain affiliate links which enable us to share in the revenue of any purchases made.

]]>
Excire Foto 2022 can analyze and keyword your entire photo library using AI https://www.popphoto.com/how-to/excire-foto-2022/ Fri, 24 Jun 2022 00:08:53 +0000 https://www.popphoto.com/?p=176189
Photographer at a computer importing photos
Thanks to tools like automatic keywording and duplicate detection, metadata management can take little effort. Getty Images

Tidy up your image database with just a few clicks of the mouse.

The post Excire Foto 2022 can analyze and keyword your entire photo library using AI appeared first on Popular Photography.

]]>
Photographer at a computer importing photos
Thanks to tools like automatic keywording and duplicate detection, metadata management can take little effort. Getty Images

We may earn revenue from the products available on this page and participate in affiliate programs. Learn more ›

I sometimes feel like the odd-photographer-out when it comes to working with my photo library. I’ve always seen the value of tagging images with additional metadata such as keywords and the names of people who appear (I’ve even written a book about the topic). 

However, many people just don’t want to bother. It’s an extra step—an impediment really—before they can review, edit, and share their images. It requires switching into a word-based mindset instead of an image-based mindset. And, well, it’s boring.

And yet, there will come a time when you need to find something in your increasingly growing image collection, and as you’re scrolling through thumbnails and trying to remember dates and events from the past, you’ll think, “Maybe I should have done some keywording at some point.”

In an earlier column, I took a high-level look at utilities that use AI technologies to help with this task. One of the standouts was Excire Foto, which has just been updated to version 2.0 (and branded Excire Foto 2022). I was struck by its ability to automatically tag photos, and also the granularity you can use when searching for images. Let’s take it for a spin.

Related: The best photo editor for every photographer

A few workflow notes

Excire Foto is a standalone app for macOS or Windows, which means it serves as your photo library manager. You point it at existing folders of images; you can also use the Copy and Add command to read images from a camera or memory card and save them to a location of your choice. If you use a managed catalog such as Lightroom or Capture One that tracks metadata in its own way, Excire Foto won’t work as well. A separate product, Excire Search 2, is a plug-in for Lightroom Classic.

Or, Excire Foto could be the first step in your workflow: import images into it, tag and rate them, save the metadata to a disk (more on that just ahead), and then ingest the photos into the managed photo editing app of your choice.

Since the app manages your library, it doesn’t offer any photo editing features. Instead, you can send an image to another app, such as Photoshop, but its edits are not round-tripped back to Excire Foto.

For my testing, I copied 12,574 photos (593 GB) from my main photo storage to an external SSD connected to my 2021 16-inch MacBook Pro, which is configured with an M1 Max processor. Importing them into Excire Photo took about 38 minutes, which entailed adding the images to its database, generating thumbnail previews, and analyzing the photos for content. Performance will depend on hardware, particularly in the analysis stage, but it’s safe to say that adding a large number of photos is a task that can run while you’re doing something else or overnight. Importing a typical day’s worth of 194 images took less than a minute.

Automatic keywording

excire foto 2022
Review and rate photos in Excire Foto 2022. Jeff Carlson

To me, those numbers are pretty impressive, considering the software is using machine learning to identify objects and scenes it recognizes. But still, do you really care about how long an app imports images? Probably not.

But this is what you will care about: In many other apps, the next step after importing would be to go through your images and tag them with relevant terms to make them easier to find later. In Excire Foto, at this point all the images include automatically generated keywords—much of the work is already done for you. You can then jump to reviewing the photos by assigning star ratings and color labels, and quickly pick out the keepers.

I know I sound like a great big photo nerd about this, but it’s exactly the type of situation where computational photography can make a big difference. To not care about keywords and still get the advantages of tagged photos without any extra work? Magic. 

excire foto 2022
The keywords in blue were created by the app, while keywords in gray were ones I added manually. Jeff Carlson

I find that Excire Foto does a decent-to-good job of identifying objects and characteristics in the photos. It doesn’t catch everything, and occasionally adds keywords that aren’t accurate. That’s where manual intervention comes in. You can manually delete keywords or add new ones to flesh out the metadata with tags you’re likely to search for later. For example, I like to add the season name so I can quickly locate autumn or winter scenes. Tags that the software applies appear with blue outlines, while tags you add show up with gray outlines. It’s also easy to copy and paste keywords among multiple images.

All of the metadata is stored in the app’s database, not with the images themselves, so you’re not cluttering up your image directories with app-specific files (a pet peeve of mine, perhaps because I end up testing so many different ones). If you prefer to keep the data with the files, you can opt to always use sidecar files, which writes the information to standard .XMP text files. Or, you can manually store the metadata in sidecar files for just the images you want.

Search that takes search seriously

excire foto 2022
Explore the keyword hierarchy tree to perform specific term searches. Jeff Carlson

The flip side of working with keywords and other metadata is how quickly things can get complicated. Most apps try to keep the search as simple as possible to appeal to the most people, but Excire Foto embraces multiple ways to search for photos.

A keyword search lets you browse the existing tags and group them together; as you build criteria, you can see how many matches are made before running the search. The search results panel also keeps recent searches available for quick access.

excire foto 2022
You can get pretty darn specific with your searches. Jeff Carlson

Or consider the ability to find people in photos. The Find Faces search gives you options for the number of faces that appear, approximate ages, the ratio of male to female, and a preference for smiling or not smiling expressions.

excire foto 2022
The Find Faces interface allows you to search for particular attributes. Jeff Carlson

Curiously, the people search lacks the ability to name individuals. To locate a specific person you must open an image in which they appear, click the Find People button, select the box on the person’s face, and then run the search. You can save that search as a collection (such as “Jeff”), but it’s not dynamically updated. If you add new photos of that person, you need to manually add them to the collection.

excire foto 2022
Search for a person by first opening an image in which they appear and selecting their face identifier. Jeff Carlson

It appears that the software isn’t necessarily built for identifying specific people, instead, it’s looking for shared characteristics based on whichever source image is chosen. Some searches on my face brought up hundreds of results, while others drew fewer hits.

Identifying Potential Duplicates

New in Excire Foto 2022 is a feature for locating duplicate photos. This is a tricky task because what you and I think of as a duplicate might not match what the software identifies. For instance, in my library, I was surprised that performing a duplicate search set to find exact duplicates brought up only 10 matches.

That’s because this criteria looks for images that are the exact same file, not just visually similar. Those photos turned out to be shots that were imported twice for some reason (indicated by their file names: DSCF3161.jpg and DSCF3161-2.jpg).

excire foto 2022
How duplicates like this get into one’s library will forever be a mystery. Jeff Carlson

When I performed a duplicate search with the criteria set to Near Duplicates: Strict, I got more of what I expected. In the 1007 matches, many were groups of burst photos and also a selection of image files where I’d shot in Raw+JPEG mode and both versions were imported. The Duplicate Flagging Assistant includes the ability to reject non-Raw images, or in the advanced options you can drill down and flag photos with more specific criteria such as JPEGs with the short edges measuring less than 1024 pixels, for example.

excire foto 2022
Choose common presets for filtering possible duplicates, or click Advanced Settings to access more specific criteria. Jeff Carlson

As with all duplicate finding features, the software’s job is primarily to present you with the possible matches. It’s up to you to review the results and determine which images should be flagged or tossed.

End Thoughts

It’s always tempting to jump straight to editing images, but ignoring metadata catches us out at some point. When a tool such as Excire Foto can shoulder a large portion of that work, we get to spend more time on editing, which is the more exciting part of the post-production process, anyway.

The post Excire Foto 2022 can analyze and keyword your entire photo library using AI appeared first on Popular Photography.

Articles may contain affiliate links which enable us to share in the revenue of any purchases made.

]]>
VSCO’s new pink and blue-hued ‘infrared’ filters https://www.popphoto.com/news/new-vsco-pink-blue-infrared-filters/ Sun, 23 Jan 2022 13:00:00 +0000 https://www.popphoto.com/?p=160766
VSCO IR7 filter
An example of VSCO's new "IR7" filter (right). Harry Guinness

VSCO has two new sets of IR filters available in its mobile app, exclusive for VSCO members.

The post VSCO’s new pink and blue-hued ‘infrared’ filters appeared first on Popular Photography.

]]>
VSCO IR7 filter
An example of VSCO's new "IR7" filter (right). Harry Guinness

We may earn revenue from the products available on this page and participate in affiliate programs. Learn more ›

It may be associated with trendy teens, but VSCO is also one of the most well-respected smartphone editing platforms available, with a serious photography pedigree—the company started off in 2011 creating Lightroom presets and Photoshop actions that emulate classic film stocks. These days, though, it’s also about the VSCO app.

Adding on to its impressive list of app-based editing features and functions—including effects built from actual film scans—VSCO has released two new sets of “infrared” filters that create dreamy blue and pink hues.

What is Infrared (IR) photography?

As the name suggests infrared photography captures infrared light wavelengths that aren’t visible to the naked eye. Capturing this IR light with traditional film requires the use of a special film stock and a filter. For digital photography, it actually involves modifying your camera to remove the IR blocker in front of the sensor (most digital cameras are already sensitive to IR). There are services out there that will do this for you, but for most folks, it’s probably best to leave your camera’s IR filter in place.

IR photos have a unique look because most subjects in a scene reflect IR light differently than they do visible light—you just can’t see it. Greenery and foliage, for example, strongly reflect IR light, which makes them appear as if they’re glowing. Portraits have a soft, almost radiant look to them because IR light penetrates a few millimeters into the skin of subjects before bouncing back, and skies go incredibly dark because less IR light is scattered passing through the atmosphere than visible light

It’s trippy, and because IR light doesn’t really have a color as we’d know it, shooting infrared light also creates false colors in your images. Kodak Ektachrome Professional Infrared film reproduced infrared as red, red as green, and green as blue, for example. And while digital photography allows for more control of how colors are rendered, shooting IR with a digital camera still tends to result in some unusual tones

VSCO’s new IR filters

VSCO IR filters 1,2,3
From left to right, VSCO’s original IR filters include IR1, for landscapes, IR2 for portraits, and IR3 for an infrared effect in B&W. Harry Guinness

VSCO’s “Infrared” filters attempt to emulate the look associated with IR photography without, you know, actually taking a photo of anything in the IR spectrum. The new ones build off of the brand’s more-traditional, existing IR filters: “IR1” for landscapes, “IR2” for portraits, and “IR3” for B&W photos.

Compared to those three, the new filters are a bit more nuanced. They include, “IR4” for pink-toned landscapes, “IR5” for pink-toned portraits, “IR6” for blue-toned landscapes, and “IR7” for blue-toned portraits. Let’s take a closer look at each.

‘IR4’ Infrared Pink Landscape

VSCO IR4 filter
Left: Original photo; Right: With IR4 applied. Harry Guinness

IR4 desaturates the image and pushes everything, especially green tones, towards pink. It’s nowhere near as saturated as the IR1 filter. But that’s the point.

‘IR5’ Infrared Pink Portrait

VSCO IR5 filter
Left: Original photo; Right: With IR5 applied. Harry Guinness

IR5 desaturates the image and pushes everything, especially green tones, towards pink while preserving skin tones.

‘IR6’ Infrared Blue Landscape

VSCO IR6 filter
Left: Original photo; Right: With IR6 applied. Harry Guinness

IR6 desaturates the image and pushes everything towards a cool blue.

‘IR7’ Infrared Blue Portrait

VSCO IR7 filter
Left: Original photo; Right: With IR7 applied. Harry Guinness

And IR7 desaturates the image and pushes everything towards a cool blue while preserving skin tones.

Initial impressions

Honestly, I’m pretty impressed with VSCO’s take on IR photos. The colors look great and about as accurate as any IR-emulating filter can realistically be. 

The one area where it all falls short is the skies: they just don’t have the darkness and richness of a true IR photo and, really, there’s no way to reliably emulate that with a filter. You just have to make some tweaks with some of VSCO’s other tools if you want to nail the authenticity. 

Still, though, VSCO continues to cement itself as one of the best mobile editors out there. And these new filters are a nice expansion of their already thorough editing suite.

How to get VSCOs infrared filters

The VSCO app is available for free on Apple iOS and Android. However, to use the new IR filters you need to sign up for a VSCO Membership. It costs $19.99/year.

The post VSCO’s new pink and blue-hued ‘infrared’ filters appeared first on Popular Photography.

Articles may contain affiliate links which enable us to share in the revenue of any purchases made.

]]>
Capture One discontinues standalone versions for Fujifilm, Nikon, Sony https://www.popphoto.com/gear/capture-one-for-fujifilm-nikon-sony-discontinued/ Fri, 21 Jan 2022 00:37:07 +0000 https://www.popphoto.com/?p=160632
A man using Capture One Pro software on a desktop computer.
Capture One

Existing customers can keep using their perpetually-licensed software or transition to the latest Capture One Pro 22.

The post Capture One discontinues standalone versions for Fujifilm, Nikon, Sony appeared first on Popular Photography.

]]>
A man using Capture One Pro software on a desktop computer.
Capture One

We may earn revenue from the products available on this page and participate in affiliate programs. Learn more ›

Danish software company Capture One has made a big change this week to the way it distributes its eponymously-named imaging utility. Effective immediately, the co-branded variants of Capture One Pro for owners of Fujifilm, Nikon, and Sony cameras have all been withdrawn from sale. Note that Capture One Express versions aren’t affected.

If you’re using any of these apps, you have a few choices as to how to proceed.

Subscription customers can upgrade for free in April

If you’re a subscription customer, your current pricing is locked in and you’ll be offered a free upgrade to Capture One Pro 22 in early April 2022. At that point you can opt to install the Pro version, gaining access to its support for a wide range of camera brands rather than the single brand supported by your current version.

Alternatively, you can decline the upgrade and stick with your current software, which the company says will continue to receive feature updates through the lifetime of Capture One 22.

So can perpetually-licensed customers who’re up to date

If you’re perpetually licensed rather than paying for an ongoing subscription, the situation depends on the current version of your software. If you’re licensed for Capture One 22 for Fujifilm, Nikon, or Sony, you’ll get a free upgrade to Capture One Pro 22 (or the option to remain with your existing software).

Should you decide to defer the upgrade, you will still be able to get it without paying, so long as you make that move prior to Capture One 23’s launch in the latter part of this year. Again, feature updates will continue through Capture One 22’s lifetime.

Owners of older perpetual licenses get discounted upgrades

But if you own a co-branded version of Capture One 21 or earlier, there’s no free path forward. Instead, you’ll need to pay to upgrade to the latest version, if you need its expanded camera support and/or the features added since your existing release.

To give you a gentle nudge in that direction, Capture One is offering a 25% discount on the Pro license valid through April 18th, 2022, effectively making the upgrade cost the same as what you’d have paid for a co-branded Capture One 22 upgrade previously.

A win for customers and Capture One alike

Obviously, the news is something of a win for photographers who are currently shooting with a co-branded version of Capture One 22, as they’ll be getting access to much broader camera support for no additional cost. But unless you’re using a release older than version 22, you won’t be gaining any new features. The co-branded releases were at feature parity with the full version, save for their more limited selection of file formats.

As for why the change is being made, the company says that by streamlining its product offerings, it will better be able to focus on improving its software and services to meet photographers’ needs. More info can be found in a FAQ document detailing the changes.

The post Capture One discontinues standalone versions for Fujifilm, Nikon, Sony appeared first on Popular Photography.

Articles may contain affiliate links which enable us to share in the revenue of any purchases made.

]]>
Capture One 21 Pro review: Raw power https://www.popphoto.com/reviews/capture-one-pro-review/ Mon, 26 Jul 2021 19:31:41 +0000 https://www.popphoto.com/?p=151845
Capture One Pro editing
You get a very robust set of image editing tools and options. Stan Horaczek

Capture One 21 Pro offers some of the most advanced photo editing features and imager quality available.

The post Capture One 21 Pro review: Raw power appeared first on Popular Photography.

]]>
Capture One Pro editing
You get a very robust set of image editing tools and options. Stan Horaczek

We may earn revenue from the products available on this page and participate in affiliate programs. Learn more ›

Getting started with Capture One Pro can be intimidating. Maybe it’s the “pro” in the name. Or perhaps it’s the fact that it used to be designed specifically for high-end photographers shooting with fancy Phase One medium format digital cameras. Capture One Pro software has come a long way from those days, though. It still comes with a learning curve, but it’s now one of the most powerful and complete image editing programs around. It also has some distinct advantages over its venerable adversary, Adobe Photoshop Lightroom Classic. Here’s a look at the latest version of Capture One to help you decide the future of your photography workflow.

What is Capture One 21 Pro?

Like Lightroom Classic, Capture One 21 Pro is designed to handle your entire raw processing workflow. You drag in raw files from your camera, sort them, edit them, then export finished versions to match your specific needs. 

It’s a non-destructive editor, which means it leaves your original files alone during the editing process. Capture One keeps track of your adjustments and lets you see them in real-time as you make changes. Then, you can export a finished version while leaving your raw file untouched. 

Getting organized

Capture One Pro camera details
The interface will take some getting used to if you switch from Lightroom Classic. Stan Horaczek

Capture One Pro gives you two options when you’re importing images. You can reference files that sit in folders on your hard drive or the program gives you the option to bring the files into the CaptureOne Library and store everything in one enormous file. If you’ve ever used Apple Photos or even Apple’s old pro-grade image processing software, Aperture, this is the same basic mechanism. 

I prefer to leave my photos in their folders, mostly out of paranoia. Conglomerating everything into one big file would be handy for managing space, though. Lightroom doesn’t offer this feature at all. 

Starting the edit process with Capture One Pro

Here’s where things start to get a little complicated, at least if you’re new to the program. Capture One splits its editing tools up into panels, which are represented by icons in the top left area of the interface. Within those panels, you’ll find all the standard editing options, as well as some more advanced adjustments for high-skill users. The Exposure panel contains most of the familiar sliders for adjusting things like exposure and color balance. 

You’ll find a row of cursor tools across the top of the frame. These are more similar to Photoshop’s tools. They allow you to crop, rotate, and even add selective adjustments to the image. 

Digging into layers

Those selective adjustments mentioned above represent another way in which Capture One works very differently from Adobe Lightroom Classic. Capture One adds adjustment layers to your image so you can easily tweak and even discard them if you screw up. In Lightroom, local adjustments aren’t as flexible and don’t give you as much forgiveness if you mess up. 

Image quality

Capture One Pro presets
The built-in styles and presets have some winners and some you’ll probably never use. Stan Horaczek

When it comes to pure image quality, I find Capture One the best in the bunch. Every raw conversion software works slightly differently and whatever Capture One does, seems to work at least a little better than its competition. 

Once you start working on the image, Capture One offers a number of styles and preset looks to choose from. As with many other editing programs, many of the styles deliver somewhat underwhelming results that look rather unnatural. Capture One’s presets, however, provide simple adjustments that I have found helpful on more than one occasion. As you scroll over the preset names, you can get a real-time preview of how it will affect the image. 

Capture One Pro also supports third-party presets. If you already bought some preset packs from a brand or influencer, you should check to see if they’re compatible with Capture One as well as Lightroom. Many of them don’t work across platforms. Some will make you rebuy presets you’ve already paid for to work on your new program. 

I was pleasantly surprised by Capture One’s auto adjustment tool. It’s easy to brush off automatic corrections as lazy and ineffective, but this one didn’t offend my eyeballs, which puts it above just about every other one I’ve ever tried. 

The Auto-Adjust feature even lets you tweak which aspects of the photo you want it to affect. You can select any of the following: White balance, exposure, contrast and brightness, high dynamic range, levels, rotation, and keystone. It’s handier than you might expect, even if you’re an editing snob. 

Learning the ropes of Capture One Pro

There’s nothing quite like practice to help you learn a new process. But, Capture One also includes a Learn channel right in the program itself. Click the button in the upper right of the interface and it brings up a pop-up with a host of video tutorials to guide you through various parts of the editing process. 

I know it’s tempting to blow past stuff like this and learn by clicking buttons and cranking sliders. But, the tutorials are well-done and very informative so I recommend them if you’re thinking about committing to Capture One 21 Pro long term. 

Working around plug-ins

While some image editing programs allow for plug-ins to tweak their functionality, Capture One doesn’t work like that. Instead, the program allows you to send images to another program to make adjustments before bring the tweaked file back in to finish it up and export it. This isn’t as convenient as simply installing a plug-in, but it gets around weirdness with compatibility and security when plug-ins malfunction or go out of date. 

Shooting tethered

When Capture One was new, tethered shooting was a huge part of its appeal. This feature allows you to connect your camera directly to a computer and automatically import each shot after it’s captured. 

Capture One makes this process very easy and it works super quickly. It’s the best tethering experience in my opinion. 

Speed and performance

For a while, Capture One 21 Pro had a noticeable speed advantage over Lightroom in terms of loading previews and applying adjustments. Now, the gap seems much closer. Capture One still feels a little faster, but it’s not a vast difference. 

Learning the keyboard shortcuts will really help speed up the overall experience. Like in Photoshop, you can cycle through the different cursor tools using specific letters on the keyboard. It’s handy and, once you learn them, you likely won’t forget them. It becomes second nature. 

Capture One 21 Pro buying options

If you want a full version of Capture One 21 Pro, you can buy it outright for $299. That’s not cheap, but it’s not even an option in the Adobe ecosystem. If you want Lightroom Classic, you’ll have to pay for a subscription each month no matter what. Capture One also offers a subscription, but it costs $20 per month. That’s twice the price as Adobe’s Creative Cloud Photography plan, which also includes the full version of Photoshop. 

If you only need support for specific camera systems, you may be able to get the program cheaper. Capture One offers specific Nikon, Sony, and Fujifilm editions (sorry Canon) that offer a discount. In those cases, the full version costs $199 and the annual subscription will set you back $149. That’s a very noticeable reduction. 

It’s worth noting that the versions work the old-fashioned way. Buying a full copy of Capture One 21 Pro will get you future updates, but it won’t get you free access to full releases in the future. So, even if you buy a full version of Capture One 21 Pro, you’ll have to pay an upgrade fee when Capture One 22 Pro comes down the line. 

Who should buy Capture One Pro?

If you’re looking for something that’s compatible across mobile and desktop, Capture One isn’t the way to go. While Adobe has made serious efforts to integrate its Creative Cloud experience across devices, Capture One is only built for computers, at least for the moment.

Pound-for-pound, Capture One Pro is the best raw image editing software on the market at the moment. It comes with a learning curve and, if you’re transitioning from Lightroom Classic, you may find it rather jarring. Capture One offers a 30-day trial period in which you get full access to the program to see if it fits your workflow. Even if you’re a die-hard Adobe fan, it’s worth a try.

The post Capture One 21 Pro review: Raw power appeared first on Popular Photography.

Articles may contain affiliate links which enable us to share in the revenue of any purchases made.

]]>
Adobe Lightroom Classic review: The old standard still has lots of life left in it https://www.popphoto.com/reviews/adobe-lightroom-classic-review/ Fri, 23 Jul 2021 17:00:00 +0000 https://www.popphoto.com/?p=151656
Adobe Lightroom Classic develop module
The develop module is where you'll find the most advanced editing tools. Stan Horaczek

After 15 years, Adobe Lightroom Classic still finds itself at the top of the photo workflow heap.

The post Adobe Lightroom Classic review: The old standard still has lots of life left in it appeared first on Popular Photography.

]]>
Adobe Lightroom Classic develop module
The develop module is where you'll find the most advanced editing tools. Stan Horaczek

We may earn revenue from the products available on this page and participate in affiliate programs. Learn more ›

Photographers can be creatures of habit. We’ll find ourselves getting attached to a lens or a camera body. Or, in the case of Adobe Lightroom Classic, a piece of photo editing software. Lightroom Classic has been around in some form or another for 15 years now. It currently shares the Creative Cloud lineup with the simply-titled Lightroom, which Adobe released to give users a tighter integration with the mobile version of the program. 

In true photographer fashion, however, Lightroom users weren’t ready to give up the die-hard desktop version of their favorite photography workflow tool. As a result, Adobe Lightroom Classic lives on. 

Despite its age and its position outside the spotlight in Adobe’s lineup, Lightroom Classic still feels as relevant as ever. Sure, some features have gotten clunky over time, and its resource management can still tax even the most powerful editing computers. But, Adobe is still giving Lightroom Classic new features all the time, and just this summer it got a few notable upgrades. Here’s a look at the state of one of the best image editing programs of all time. 

What is Adobe Lightroom Classic

It can be slightly hard to envision exactly what Adobe Lightroom Classic is if you’ve never used it before. Essentially, it’s a photography workflow tool that’s designed to help import, organize, sort, edit, and export images. 

It also facilitates tethered shooting, in which you can attach your camera directly to the computer running Adobe Lightroom Classic and shoot photos directly into the program. This is particularly handy in a studio situation where you want to see big previews of your photos in a hurry so a creative director can look over your shoulder and tell you what’s wrong with them in real-time. 

The mighty organizer

Stan Horaczek

SEE IT

If you work with photos in high volume, Lightroom’s import interface is very handy once you get the hang of it. The software creates catalogs into which you can import photos (hopefully those of the raw variety). Some users create many different catalogs. Others simply create one big catalog and then organize their folders and files within it. I prefer the latter solution simply because I don’t trust myself not to lose my catalog files or forget which images belong inside which catalog. When everything is in one place, I can definitely find it, even if it takes a while. 

Importing the photos can pull them off of a memory card and onto the computer. If they’re already on your computer, you can simply point the software to their location and edit them right where they are. Lightroom is a non-destructive editor. That means the program makes adjustments by keeping track of the changes in a file that’s separate from the original photo. So, if you brighten up an image, you’re simply telling Lightroom “When you show me this photo, make it brighter,” rather than making a permanent change to the original file. You won’t see the finished file until you export a jpeg or tiff file. 

Within the catalogs, you can create collections and photographers like to use these in different ways. My workflow typically involves doing an initial sort in which I pick the select images by pressing “B” to add them to a quick collection. Then, I add the selects to a smart collection so I can work on the selected images without trashing the rest. Ask another photographer and they’ll likely tell you they work differently. That’s part of the beauty of a piece of software that has been around this long. 

Adobe Lightroom Classic editing tools

Once you’ve got your images selected, it’s time to tweak them. Adobe Lightroom Classic offers a familiar set of tools that you may have seen if you’ve ever used Photoshop’s Camera Raw feature. You can adjust exposure, contrast, sharpness, crop, and all the rest of the usual suspects. 

Lightroom will let you make the editing process as simple or as complicated as you want. If you’re just learning, you can stick to the Library module and use the quick edit buttons. Switch to the Develop module and sliders replace the buttons for more granular control. This is also where you’ll find more advanced editing tools. You can mess around with the tone curve or tweak specific variables of individual colors. If you can look at an image and say, “there’s too much saturation in the blues across the dark areas of this image,” then Lightroom Classic has the tools to let you fix it.

The Develop module also houses a couple of Adobe Lightroom Classic’s other useful features. The Upright tool automatically tries to straighten out your images. So, if your idyllic beach scene has a distracting, crooked horizon, Upright can fix that automatically. The Lens Correction tool also allows you to apply lens profiles that iron out the quirks of your favorite lenses. This feature typically flattens out the field of view a little. It also often brightens up the corners of the image to counteract the lens’s natural vignette. It makes a big difference in many cases. 

Local adjustments

Adobe Lightroom Classic local adjustments
The spot healing tool samples areas around the selected spot as source material for its adjustments. It’s good for small spots, but not great for tricky stuff like trying to remove these scratches from a negative. Stan Horaczek

If you want to do in-depth retouching, then Photoshop is the tool you want. It’s not even a contest. Adobe Lightroom Classic does, however, offer some tools for making local adjustments. The spot removal tool is relatively useful, but it doesn’t give you much in the way of brush options like you’d get in Photoshop. It’ll quickly nuke a small mark off of a wall, but or dust spots off of a photo negative, but you wouldn’t want to do a full portrait retouch with it. It’s just too awkward. 

The gradient and radial filters are useful if you want to correct some weirdness that happens around the frame. The gradient filer, for instance, can be useful if the sky in the top part of your photo is a lot brighter than the landscape in the bottom part of your photo. The radial filter is similarly useful for helping to cure vignettes. You could also add a vignette if you really wanted to, but in my experience, that makes your photo worse 100 percent of the time. 

Lastly, the adjustment brush tool allows you to select changes and then paint them onto specific areas. So, if one part of an image is too dark, but the rest looks correct, you can try to single out that outlying area with the brush. It’s like the dodging and burning tools in Photoshop, only it can also apply adjustments to variables like the contrast in addition to typical exposure. 

Maps and Books

Lightroom Book module
The book module is useful for rough layouts, but most services have their own layout tools. Stan Horaczek

I’m grouping these features together because I find myself using them rarely. Even if my photos have geotags attached to them, I’d rather track them using software like Google Photos. The Books feature is also handy if you want to rough out a layout, but many book services now have their own workflow software. 

Overall performance

Adobe Lightroom Classic has made some real strides in terms of speed in recent years. The program only started implementing GPU acceleration back in 2019, which was a step in the right direction. 

The current edition of Lightroom Classic runs fairly quickly most of the time for me. Even on my several-year-old laptop, I can still work at a reasonable (though, not super fast) pace. I typically let the program generate previews as I import the images, which makes the process take longer, but also saves me time during the editing process. 

When you switch from one photo to the next, there’s an inevitable lag while you wait for the high-res preview to load. Even on a fast computer, it can get bogged down, especially if you’ve been editing for a long time. My main computer has 64 GB RAM and an AMD Ryzen 9 processor, and it still gets to sounding like an airplane about to take off when I’m moving quickly through photos. 

Interestingly, I found that Lightroom Classic runs really excellently on Apple’s new M1-powered computers. Even the minuscule M1 MacBook Air handled the program surprisingly well. Hopefully, Adobe will continue trying to make Lightroom Classic run faster with future updates. 

Who should buy Adobe Lightroom Classic?

Other photo workflow programs have come along and shown some advantages over Lightroom Classic. Capture One Pro, for instance, provides slightly better overall image quality and a more refined interface when it comes to making edits. Luminar has some very smart AI-driven editing features that automate otherwise tedious tasks. 

Still, at the end of the day, many photographers come back to Lightroom Classic. It has a learning curve, but once you’ve navigated it, it’s hard to leave. After heavy use, the shortcuts become second nature and you get sucked into it. 

Eventually, it seems inevitable that Adobe will try to shoehorn Lightroom Classic users into the more modern Lightroom software. Frankly, I’m surprised it hasn’t done more to encourage that transition already. 

If you want access to Adobe Lightroom Classic, you will need a Creative Cloud subscription Adobe still offers the Creative Cloud Photography plan, which includes both versions of Lightroom, the full version of Photoshop, and several Photoshop mobile apps for $10 per month. I don’t love having to subscribe to my software (a common outlook in the photography community), but I can appreciate the low price of that plan. And with Creative Cloud speeding up the frequency with which the software gets updated, the subscription life does have its upsides. 

For now, Adobe Lightroom Classic is still the champion in the complete photography workflow world. The competition gets closer every day, though. 

The post Adobe Lightroom Classic review: The old standard still has lots of life left in it appeared first on Popular Photography.

Articles may contain affiliate links which enable us to share in the revenue of any purchases made.

]]>
Best film emulation presets for your digital photos in 2023 https://www.popphoto.com/reviews/the-best-film-emulation-presets-for-your-digital-photos/ Sun, 01 Aug 2021 00:00:00 +0000 https://www.popphoto.com/?p=152275
Looks Like Film presets
Looks Like Film

Film emulation presets can make your digital images look like they were shot analog.

The post Best film emulation presets for your digital photos in 2023 appeared first on Popular Photography.

]]>
Looks Like Film presets
Looks Like Film

We may earn revenue from the products available on this page and participate in affiliate programs. Learn more ›

Authenticity Mastin Labs presets Mastin Labs presets
SEE IT

These carefully designed presets loyally recreate popular film stocks.

Light and airy Noble presets Noble presets
SEE IT

These presets match a style that’s extremely popular with high-end photographers.

Options RNI RNI All Films 5
SEE IT

You get more than 180 presets with the RNI pack.

The best way to get your photos to look like film? That’s easy: Shoot film. Unfortunately, film prices have been on the rise lately. In fact, the secondary camera market has been getting a little out of hand, too. So, what should you do? Look for the best film emulation photo editing presets. 

These simple styles adjust the tones, colors, and often the grain in your images to give them a decidedly analog look even if they came from your modern camera. There are tons of different presets out there and it can be hard to sort through them. We put together this guide to some of the most popular film emulation photo editing presets to help you figure out which ones work best for you. 

  • Best film emulation presets for authenticity: Mastin Labs
  • Best film emulation presets for experimental work: Looks Like Film
  • Best film emulation presets for lots of options: RNI
  • Best film emulation presets for the “light and airy” look: Noble Presets

What are film emulation presets anyway?

Whatever program you’re currently using to edit photos probably already has a set of presets already baked in. You likely don’t use them very much because, frankly, most of them kinda suck. Both Adobe Lightroom and Capture One (which calls them styles) ship with a stock selection of built-in presets. 

When you click to apply a preset, it automatically adjusts the program’s settings to try and give the photo a specific look. Take a simple one like Adobe’s built-in high-contrast black and white setting. It switches the image to monochrome and bumps the contrast up with one click. That’s about as basic as presets get. 

When you start getting into more complex presets, they can involve tons of tiny tweaks in just about every aspect of the image. Apply an advanced preset to an image in Lightroom, then go looking through the adjustment panels. You’ll likely see tweaks made to sliders you’ve never even touched. Sure, some of us have gone in and said, “I think there’s just a little too much green in the shadows of this photo,” but not everyone goes to that extent. 

Why would I want to use presets?

Some people dislike the idea of buying into a pre-packaged look for their photos. I get it, but I don’t agree with it. In truth, this kind of thing has been part of photography since the film days. When you went out shooting, you took film with you that produced the specific colors and tones that fit your needs. 

Now, when you take your digital camera out in the world, you’re not getting a totally unbiased image of what’s happening in the real world. The photo is a product of the camera’s own processing system as its designers saw fit. 

Think of choosing a preset like you’d select a film stock.

Pick your platform

Before you go buying preset packs, you should make sure you’re solidified in your choice of the best photo editor for you. Typically, companies will require you to buy and download presets for specific platforms. Presets meant for Lightroom, for instance, won’t simply work as Styles for Capture One Pro. They’re entirely different things and they take the same amount of work to create. That’s why companies often charge you twice if you want to get presets for both programs. 

Once you know what program you’re using, you’ll have to know how to actually install the presets. Some packs will come with installer files that will automatically put the data where it needs to go for the presets to show up in the software’s interface. 

Here’s a direct link to Adobe’s guide on how to install profiles and presets for Lightroom. And here’s the Capture One guide to using presets and styles with its software. 

How much accuracy do you want in your film emulation?

It’s easy to think about film as this magical romantic thing here in the digital age. In reality, however, film was often a pain in the butt. Once you loaded up a roll, you were stuck with that stock until you finished it unless you wanted to needlessly waste a bunch of frames. 

Film also just acts weird sometimes. I love Kodak Ektar–it’s my favorite stock–but if youtube over-expose it, skin tones get wacky and the contrast gets out of hand. Some preset makers embrace these quirks when trying to recreate a film stock. They try to create a look that’s close enough to match real Ektar film if you were to shoot both at the same time. 

Some film presets, however, try to match the overall vibe of a stock rather than mimicking its exact performance. 

Best film emulation presets for authenticity: Mastin Labs

Mastin Labs

SEE IT

Mastin Labs offers some of the most popular film-specific presets around at the moment and for good reason. The looks closely mimic their analog inspirations thanks to extensive research during the development process. As a result, these aren’t the cheapest preset packs you’ll find. Each pack costs $99 and contains between three and four different film options as well as tweaks you can apply to each one. The Fuji Original pack, for instance, offers Fuji 160 NS, Fuji 800Z, and two versions of the now discontinued (and sorely missed) Fuji 400H. 

Mastin offers presets that work for Lightroom on PC, Capture One Pro, and Lightroom Mobile. The mobile profiles cost $30, but they’re built specifically to work on mobile without any weirdness that sometimes pops up when you try to port desktop presets. 

I personally like the Adventure Everyday pack, which includes Kodak Ektar, Kodak Gold, and Tri-X. Hard to argue with that lineup.

Don’t be afraid to tweak your presets

Just because you can apply a preset with a single click doesn’t mean you’re necessarily done with your editing. Some presets look great right off the bat, but others can require some tweaking. Plus, not every preset is made to work in every type of light. That “light and airy” preset you’re using (more on that in a few), may not do what you want it to in muddy overcast light. 

If you apply a preset and it doesn’t work, try some others or just give it some nudges in the settings. As you use your presets more, you’ll generally find that you get a sense for what it will need in a specific photo. 

Once you’ve dialed in your tweaks, both Capture One and Lightroom let you save new presets with those adjustments. So, rather than adding a preset and making the same adjustment every time, you can make your own and save some clicks. 

Best film emulation presets for lots of options: RNI All Films 5 Pro

RNI

SEE IT

Description: Shell out the $192 for RNI All Film 5 Pro and you’ll get more than 180 different presets that emulate different types of film. Sure, that’s not a cheap entry price, but it’s a lot more affordable than it would be to actually buy that much film. Plus, some of these don’t even exist anymore. 

The list includes big hitters like Kodak Ektar and Portra, as well as Fuji 400H and Velvia 100 (RIP). Each specific film also typically offers several versions to emulate things like pushing (overdeveloping to create a denser negative to make up for underexposure). 

While I like the look of many of RNI’s emulations, they don’t read as accurately as some other options. Depending on your outlook, that could either be a benefit or a detractor. You either love the absurd Ektar greens or you hate them. There’s no in-between.

Embrace the vintage feel

There was a time when “vintage” photo filters dominated the social media photography landscape. Some of you may remember VSCO’s iconic film packs which had photographers running toward lifted blacks and muted colors for every single thing they shot. It wasn’t about nailing a perfect impression of a specific stock. It was about capturing a general “film look” that felt older than it was. At first people loved it. Then, a lot of people decided they hated it. Now, things have evened out and this look has a very real place at the stylistic table. 

Some presets also go beyond simply changing tones and brightness levels. Some offer drastic shifts and overlays that change the entire look of an image. They don’t just look like they were taken with a film camera. They look like they were taken with a film camera that’s broken in a very aesthetic way. They’re liked ripped jeans. Yeah, they look cool, but they’re a little hip and your grandpa might make fun of you for them.

Best film emulation presets for experimental work: Looks Like Film

Looks Like Film

SEE IT

Looks Like Film offers several very cool preset packs at the moment, all of which seek to create photo sets with cohesive vibes. The $99 Brazen collection includes a total of 44 “buildable” presets, which means you set individual variables about the overall look. You can opt for one of the “one-click” edits and then add overlays to emulate light leaks or other weirdly compelling effects. 

The $79 Melanated preset pack also deserves specific mention because it sets out to provide simple accurate editing for darker skin tones which can often get “white washed” by other presets. The results look excellent. 

Shoot for your style, not your preset

When presets were new, photographers would dive into them wholesale. They would shape their shooting style around the look of a preset and adopt it as their overall aesthetic. It worked for many photographers, but also sometimes stifled their growth. 

It’s important to realize that a preset does not define your overall shooting style. You want to look for presets that will complement and accentuate your style, not dedicate it. 

Best film emulation presets for the “light and airy” look: Noble Presets

Noble presets

SEE IT

Overexposing negative film often gives it a bright, clean look that’s somewhat difficult to emulate with digital. It can easily start to look harsh or blown out. The Noble presets do a very solid job of taking bright images and making them look vibrant instead of jarring. The company offers three packages: color, mobile, and black-and-white. The names do a good job explaining what you can expect from them.

FAQs

Q: What is film emulation?

Individual film stocks handle scenes differently. They have their own unique ways of interpreting light and color. Film emulation presets try to match those colors and tones. Or, they at least try to give an overall filmy feel to your images. 

Q: Do professionals use presets?

Absolutely. I’m a professional and I use presets. Many high-end shooters even develop their own presets to sell and use in their own work. 

Q: How do you install presets in Lightroom?

Some presets will come with a built-in installer that will put the preset files where they need to go. Others require you to put the files there yourself. Your best bet is to check the site from which you bought the presets for a guide. You can also check here for Adobe’s official guide. 

A last word about film emulation presets for your digital photos

While I still encourage you to go out and try shooting film, I definitely appreciate the preset makers who are trying to keep the look alive. Even if none of these presets match your style, it’s good to know that the old school aesthetic still rings true to photographers today. 

The post Best film emulation presets for your digital photos in 2023 appeared first on Popular Photography.

Articles may contain affiliate links which enable us to share in the revenue of any purchases made.

]]>