Canon Announces Host of New Cinema Camera Products
Two lenses, two camcorders, and a free software upgrade for the C500
We may earn revenue from the products available on this page and participate in affiliate programs. Learn more ›
Today Canon unveiled a wide array of new cinema products, aimed at the professional video market. The new releases include two new lenses, two new mid-range cinema cameras, as well as an upcoming software update to for the popular C500 camera to help it integrate more easily into production workflows.
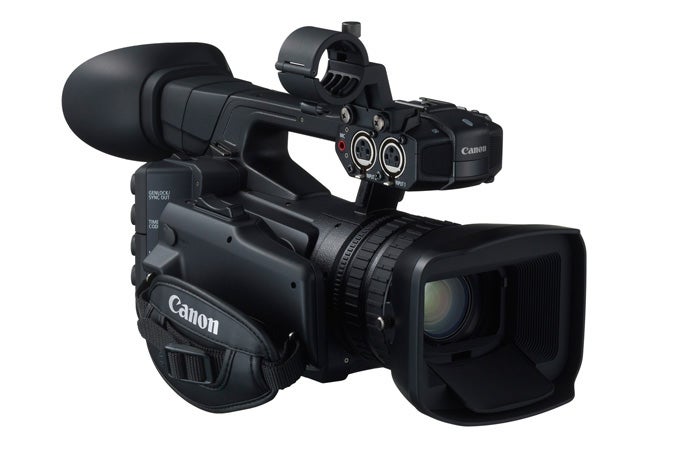
Canon announced the XF205 And XF200, a pair of what the company calls “Professional Camcorders”. The pair are designed for “news gathering, documentaries, weddings and event videography”, and both feature almost identical specs. Both the XF205 and XF200 both have 26.8 mm (35mm film equivalent) 20x optical zoom lens, with Hi-UD (Hi Index Ultra Low Dispersion) elements. The cameras feature upgraded CMOS sensors from their predecessors, and can shoot both MXF (commonly used in broadcast news) and MP4 formats. The difference between the two is that the XF205 also featues industry-standard 3G-SDI and HD-SDI output terminals as well as genlock in/SMPTE time code (in/out) terminals, and will set you back $4,400.00, where the XF200 is lacking those, and will have a list price of $3,900.00.
On the lens front, there’s the Canon CINE-SERVO 17-120mm T2.95 Zoom Lens, which will land in August for $33,000. Created for large, single-sensor digital cameras, it’s designed to work with the new generations of 4K sensors, and can work either on a shoulder mounted camera, or as a traditional cinema lens. The Digital Drive handgrip can also be removed for manual operation, and it will come in both PL- and EF-mount versions.
The HJ18ex7.6B portable HD zoom lens is crafted for 2/3-Inch sensors, and features a focal length of 7.6mm to 137mm, and can focus down to just 10mm distance in macro mode. According to Canon:
The lens will be available in June for $20,700.00 (IRSE S) and $22,600.00 (IASE S) versions.
Finally, for those who are already on board with Canon gear, the C500 will get upgraded to Cinema RAW Development 1.3 come October, which will help with on-set workflows. This update is set to improve compatibility with Intel® Iris™ Pro Graphics-Powered PCS. Computers using Intel Iris Pro graphics should be able to crunch 4K Cinema RAW data faster with the upgrade, and it will feature real time playback of 4K raw.