Crikey! Critters large and small rule Australian Geographic’s 2021 photo awards
Check out our favorite images from Australian Geographic's Nature Photographer of the Year contest. Unless, of course, you hate snakes, spiders, ants, or lizards.
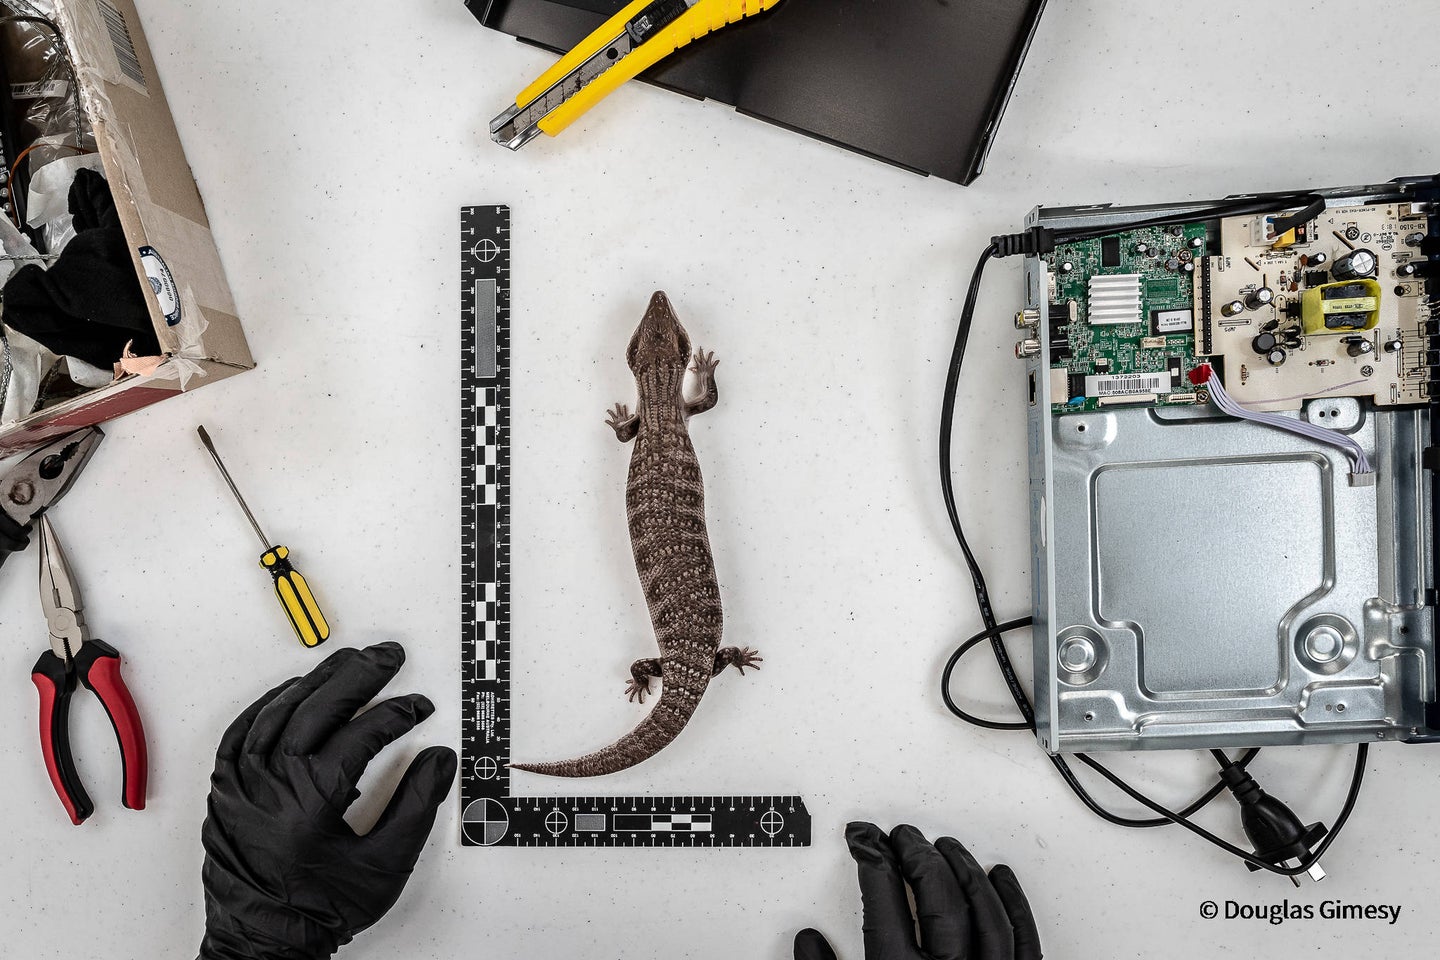
Description: 'A wildlife officer measures one of two blue-tongued lizards found bound and stuffed inside a DVD player. Posted to Asia, it was detected at a Melbourne postage sorting facility. Luckily, both were still alive'. Douglas Gimesy, Victoria
Here at Popular Photography, we love a good photo competition. It’s always cool to see well-curated images presented around a particular theme. And there are normally some interesting lessons to be learned by viewing the winners and runners-up. Recently, Australia’s version of National Geographic magazine, Australian Geographic, announced the latest round of winners for its annual Nature Photographer of the Year awards.
The categories
There were nine competition categories: Animal Behavior [sic], Animal Portrait, Botanical, Landscape, Threatened Species, Monochrome, Our Impact, Animal Habitat, and Junior. Photographers from around the world could enter, though all photos had to be of natural fauna, flora, or land formations. And entries must have been taken in the ANZANG (Australia, New Zealand, Antarctica, and the New Guinea region) bioregion. With $10,000 and a holiday awarded to the overall winner—and $1,000 for all the category winners—it clearly attracted a lot of high-quality work.
So, let’s dive in, look at some great photos, and see what we can learn.
The stunning winner
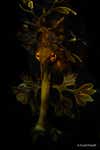
Description: ‘Leafy Seadragons hide in the thick kelp to camouflage themselves and avoid predators. The vibrant flamboyant adults blend perfectly with their surroundings. At night the backlighting on a Leafy seadragon accentuates their features and the delicate bodies that appear translucent.’ Scott Portelli, New South Wales
There were a lot of great pictures in this year’s contest. But it’s easy to see why Scott Portelli picked up the overall trophy for his shot of a leafy seadragon. (I get serious Zelda vibes from it.)
It’s worth noting that a disproportionate number of the selected photographs were underwater shots like this one. For example, of the 14 photos featured in the Animal Behavior [sic] category, five were shot in the water. And a further two were photographs of whales, captured from boats.
Junior winner
Description: ‘I spotted this lichen huntsman waiting in ambush, perfectly camouflaged on a tree trunk near our campsite in the Daintree National Park. This spider, native to north Queensland, is one of the fastest moving of all known spiders, but harmless to humans.’ Georgia McGregor, Queensland
The Junior winner, Georgia McGregor, also deserves special mention for this terrifying shot of a (supposedly) harmless lichen huntsman spider.
Gear matters, but not as much as you fear
Nature and, in particular, wildlife photography has a reputation for being gear-heavy. I’m not going to argue that you don’t have more options if you have a wide-aperture 600mm telephoto strapped to a mirrorless camera with lightning-fast autofocus that can shoot bursts at 30 frames-per-second, but the winners and runners up of this year’s competition made use a wide variety of gear.
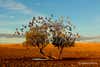
Description: ‘In the Strzelecki Desert of Australia, a flock of galahs replenishes on the only water available at the base of this lonely tree. It’s a rare photo opportunity to get such a clear and symmetrical shot of these beautiful birds in flight, in the middle of the desert.’ Christian Spencer, Victoria
Camera choice
Christian Spencer, the winner of the Animal Habitat category, for example, captured this stunning shot with a Canon Rebel T4i, a nine-year-old entry-level DSLR.
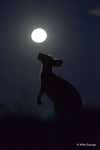
Description: ‘I spotted some eastern grey kangaroos on the headland. I had to crawl through long grass downhill from them to try and get close enough to backlight one against the rising full moon. As I took a few shots my model tilted its head back and opened its mouth slightly.’ Mike George, New South Wales
While Mike George, the runner-up of the Animal Portrait category used a Canon 5D MK II. Yes, it’s a full-frame DSLR, but it’s far from the latest and greatest. There’s also a few Nikon D7200s, and other older cameras scattered in among higher-end bodies, like the Sony A7RIIIs and Canon 1DX MK IIs.
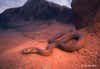
Description: ‘At the end of a blisteringly hot 45°C day conducting research, I visited a farm dam to see if any animals were having a drink or cooling off. Along a heavily eroded section of dam wall, I stumbled across this majestic snake – an adult mulga in excellent condition.’ Kristian Bell, Victoria
Lens choice
Similarly, there were a lot of different lenses used, and most of them weren’t ridiculously expensive telephoto lenses. Perhaps the nature of the categories limited the number of extreme close-ups of birds that people could enter. But it’s still nice to see nature photographs, like the one above by Kristian Bell, shot with a regular lens most photographers have in their kit bags. Bell used a Canon EF 16-35mm f/4, but any walk-around zoom would do the trick.
Context is everything
My favorite shots weren’t the aforementioned extreme close-ups of birds: They were the more interesting photos with a story to tell. And it’s clear that the judges often felt the same way.
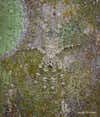
Just look at this photo by Ken Griffiths of black ants eating a gecko.

Description. ‘Black Ants Feeding on Broad-tailed Gecko. Broad-tailed Geckos are essentially found in Sydney Basin sandstone areas and are nocturnal. It was a most unusual find, especially as there are many bird species that would have made a quick meal of it. How it died is a mystery, but a feral deer or wallaby may have stepped on it the previous night.’ Ken Griffiths, New South Wales
Also, check out this one by Richard Robinson of a whale facing a boat. They’re all photos with something to say—and it’s what makes them so powerful.
Description: ‘Two centuries after near extinction, southern right whales, also called Tohora, thrive deep in the subantarctic. In 2020 a University of Auckland expedition, led by Dr Emma Carroll, visited to study the recovering population, using cutting-edge genomic techniques that will allow us to understand the complexities of these animals.’ Richard Robinson, New Zealand
How to enter next year’s contest
Entry isn’t open yet for the 2022 competition, but keep an eye on the Australian Geographic website. In the meantime, you can check out last year’s competition rules so you can make sure your photos are eligible.
